How to replace an led light?
Fitting an LED light is an easy and to the point job that can improve the illumination in your home. Knowing how to do it will mean you can carry it out in a safe and effective manner. This manual will guide you through the process of replacing an LED light and thus guarantee you a hassle-free time.
Get Ready to Work
To be able to carry out the task, first, you need to gather the required tools:
- Safety Gear: Make sure you protect your eyes and skin with safety glasses and gloves.
- Screwdrivers: The choice of a flathead and Phillips screwdriver will depend on the type of fixture you have.
- New LED: Pick an appropriate white color LED fitting for your requirements.
- Ladder: You can use a step ladder in case the light is in a high place, which will help you avoid slipping or falling.
Step 1: Disconnect the Power
The safety of the power cutoff is the foremost priority. Always turn off the power at the circuit breaker prior to the initiation of any electrical work. This will help you avoid the risk of being electrocuted.
Step 2: Take Out the Previous LED Light
Make sure you take out the previous LED light very carefully. If it is a bulb, simply twist it in the opposite direction to how it is screwed in. In case you have fixtures, you may have to unscrew it before you take it down from the wall or ceiling. Always be aware of any glass parts that may break.
Step 3: Inspection of the Fixture
Have a look at the light fixture to make sure there is no damage. If you see no frayed wires or rust, you may continue with the new LED light installation.
Step 4: Faculty of New LED Light Installation
Tip: Choose the Right Color
Consider the colors of LED lights available. LEDs come in various shades, including warm white, cool white, and daylight. Choose the one that fits your ambiance needs.
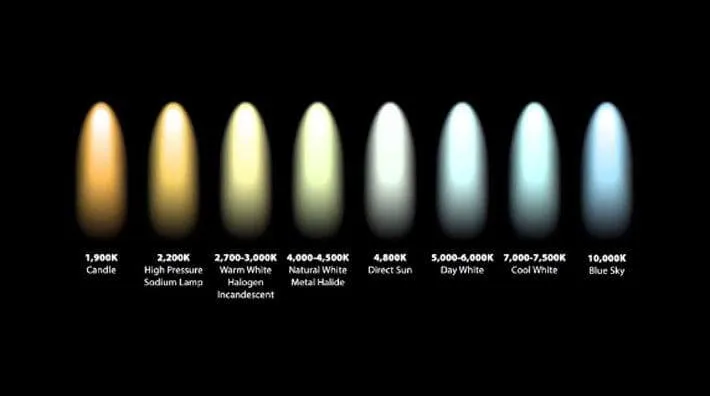
colors of led lights
Tip: The Best Color Choice
Look at the LED light color options and decide which one would be the most suitable. There are a number of LED color shades available such as warm white, cool white, and daylight color. Choose the color that suits your lighting needs.
Step 5: Re-energize
After installing the new LED light, switch on the power at the circuit breaker again. In this way, you can test the light and make sure it is in good working condition.
Step 6: Put Your Light to a Test
Turn on the switch to check if the LED light works. If the light is on, it means you have successfully finished the replacement. If it does not turn on, examine the connections, and ensure they are tight.
Step 7: Declutter the Place
Once the light is on, make sure your working area is clean. Discard the old light properly, and store all your tools in the right place. Clean and organized workspace will keep you safe and productive.
Conclusion
Replacing an LED light is a simple DIY project. Using the correct equipment and obeying the steps, you can upgrade your lighting very easily. Safety first, and remember always use white color LED designated for your needs. Have these steps been observed, and thus, will you benefit from the eco-friendly and good quality of light in your home?